参考资料:
1. Git常用指令

1.1. 新建、初始化代码库
# 在当前目录新建一个Git代码库
git init

# 新建一个目录,将其初始化为Git代码库
git init [project-name]

# 下载一个项目和它的整个代码历史
git clone [url]
# url example: https://github.com/zhang787jun/tmp.git
1.2. 仓库内文件管理
1.2.1. 增加/删除文件到暂存区
# 添加指定文件到暂存区
git add [file1] [file2] ...

# 添加指定目录到暂存区,包括子目录
git add [dir]

# 添加当前目录的所有文件到暂存区
git add .

# 添加每个变化前,都会要求确认
# 对于同一个文件的多处变化,可以实现分次提交
git add -p

# 删除工作区文件,并且将这次删除放入暂存区
git rm [file1] [file2] ...

# 停止追踪指定文件,但该文件会保留在工作区
git rm --cached [file]

# 改名文件,并且将这个改名放入暂存区
git mv [file-original] [file-renamed]
1.2.2. 忽略文件
在仓库内添加.gitignore 文件
vim .gitignore
.gitignore 文件语法:
# 忽略 以sh结尾的文件
*.sh
#以txt结尾的文件不能忽略
!*.txt
#setting 文件下的所有文件忽略
.setting/
#a文件夹下的所有txt文件忽略
/a/*.txt
在线配置.gitignore文件: https://www.gitignore.io/
# 常见的忽略文件内容
# windows bat
*.bat
# VScode
.vscode/
# docker
.devcontainer/
# Byte-compiled / optimized / DLL files
__pycache__/
*.py[cod]
*$py.class

# C extensions
*.so

# Distribution / packaging
.Python
build/
develop-eggs/
dist/
downloads/
eggs/
.eggs/
lib/
lib64/
parts/
sdist/
var/
wheels/
pip-wheel-metadata/
share/python-wheels/
*.egg-info/
.installed.cfg
*.egg
MANIFEST

# PyInstaller
#  Usually these files are written by a python script from a template
#  before PyInstaller builds the exe, so as to inject date/other infos into it.
*.manifest
*.spec

# Installer logs
pip-log.txt
pip-delete-this-directory.txt

# Unit test / coverage reports
htmlcov/
.tox/
.nox/
.coverage
.coverage.*
.cache
nosetests.xml
coverage.xml
*.cover
.hypothesis/
.pytest_cache/

# Translations
*.mo
*.pot

# Django stuff:
*.log
local_settings.py
db.sqlite3

# Flask stuff:
instance/
.webassets-cache

# Scrapy stuff:
.scrapy

# Sphinx documentation
docs/_build/

# PyBuilder
target/

# Jupyter Notebook
.ipynb_checkpoints

# IPython
profile_default/
ipython_config.py

# pyenv
.python-version

# pipenv
#   According to pypa/pipenv#598, it is recommended to include Pipfile.lock in version control.
#   However, in case of collaboration, if having platform-specific dependencies or dependencies
#   having no cross-platform support, pipenv may install dependencies that don’t work, or not
#   install all needed dependencies.
#Pipfile.lock

# celery beat schedule file
celerybeat-schedule

# SageMath parsed files
*.sage.py

# Environments
.env
.venv
env/
venv/
ENV/
env.bak/
venv.bak/

# Spyder project settings
.spyderproject
.spyproject

# Rope project settings
.ropeproject

# Intellij project settings
.idea

# mkdocs documentation
/site

# mypy
.mypy_cache/
.dmypy.json
dmypy.json

# Pyre type checker
.pyre/

# pb2.py files
*_pb2.py
1.2.3. 代码提交
# 提交暂存区到仓库区
git commit -m [message]

# 提交暂存区的指定文件到仓库区
git commit [file1] [file2] ... -m [message]

# 提交工作区自上次commit之后的变化,直接到仓库区
git commit -a

# 提交时显示所有diff信息
git commit -v

# 使用一次新的commit,替代上一次提交
# 如果代码没有任何新变化,则用来改写上一次commit的提交信息
git commit --amend -m [message]

# 重做上一次commit,并包括指定文件的新变化
git commit --amend [file1] [file2] ...
1.3. 分支管理
1.3.1. 查看分支
# 列出所有本地分支
git branch

# 列出所有远程分支
git branch -r

# 列出所有本地分支和远程分支
git branch -a
1.3.2. 创建分支
创建分支命名规范
推荐使用如下格式:ownerName/featureName。 这样既便于知道分支覆盖的功能,也便于找到分支的负责人。以后清理分支的时候也很方便。
# 新建一个分支,但依然停留在当前分支
git branch [branch-name]

git branch zhangjun/newFeature

# 新建一个分支,并切换到该分支

git branch [branch-name]
git checkout -b [branch-name]
# example
git branch zhangjun/newFeature
git checkout zhangjun/newFeature

# 新建一个分支,指向指定commit
git branch [branch-name] [commit]

# 创建一个完全独立没有log的分支
git checkout --orphan  [branch-name]

# 新建一个分支,与指定的远程分支建立追踪关系
git branch --track [branch-name] [remote-branch]
1.3.3. 切换分支
# 切换到指定分支,并更新工作区
git checkout [branch-name]

# 切换到上一个分支
git checkout -
1.3.4. 合并分支
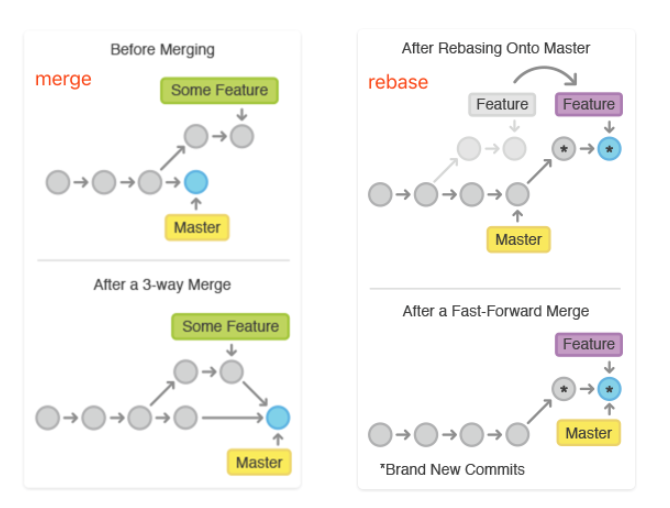
小结
1. rebase 操作可以把本地未push的分叉提交历史整理成直线;
2. rebase的目的是使得我们在查看历史提交的变化时更容易,因为分叉的提交需要三方对比。
注意:
1. 不要在master合并代码。保证master的可用性很重要。
2. 确保在正确的分支执行正确的操作。 无论是处理冲突还是更新远端代码,请保有敬畏之心。
1.3.4.1. git merge 合并
# 建立追踪关系,在现有分支与指定的远程分支之间
git branch --set-upstream [branch-name] [remote-branch]

# 选择一个commit,合并进当前分支
git cherry-pick [commit]

# 将指定分支[branch-name]合并到当前分支
git merge [branch-name]

git merge [-n] [--stat] [--no-commit] [--squash] [--[no-]edit]
    [-s <strategy>] [-X <strategy-option>] [-S[<keyid>]]
    [--[no-]allow-unrelated-histories]
    [--[no-]rerere-autoupdate] [-m <msg>] [<commit>…?]
git merge --abort
git merge --continue
1.3.4.1.1. 合并中的冲突管理
1.3.4.1.1.1. 冲突的产生
很多命令都可能出现冲突,但从根本上来讲,都是merge 和 patch(应用补丁)时产生冲突。而rebase就是重新设置基准,然后应用补丁的过程,所以也会冲突。
git pull会自动merge,repo sync会自动rebase,所以git pull和repo sync也会产生冲突。当然git rebase就更不用说了。
1.3.4.1.1.2. 冲突的类型
- 逻辑冲突
git自动处理(合并/应用补丁)成功,但是逻辑上是有问题的。
比如另外一个人修改了文件名,但我还使用老的文件名,这种情况下自动处理是能成功的,但实际上是有问题的。
又比如,函数返回值含义变化,但我还使用老的含义,这种情况自动处理成功,但可能隐藏着重大BUG。这种问题,主要通过自动化测试来保障。所以最好是能够写出比较完备的自动化测试用例。
这种冲突的解决,就是做一次BUG修正。不是真正解决git报告的冲突。 - 内容冲突
两个用户修改了同一个文件的同一块区域,git会报告内容冲突。我们常见的都是这种,后面的解决办法也主要针对这种冲突。
git pull
>>>
Auto-merging test.txt
CONFLICT (content): Merge conflict in test.txt
Automatic merge failed; fix conflicts and then commit the result.
>>>
error: project mini/sample
#一般来讲,出现冲突时都会有“CONFLICT”字样:
- 树冲突
文件名修改造成的冲突,称为树冲突。
比如,A用户把文件改名为a.txt,B用户把同一个文件改名为b.txt,那么B将这两个commit合并时,会产生冲突。
git status
>>>
    added by us:    b.txt
    both deleted:   origin-name.txt
    added by them:  a.txt
1.3.4.1.1.3. 冲突的解决
- 手动解决冲突,直到把冲突标识符删掉,再执行
git commit -am -"xxx" - 在git merge 中设置策略
- 利用图形界面工具解决冲突
- 内容冲突
直接编辑文件 - 树冲突
如果最终确定用b.txt,那么解决办法如下:
git rm a.txt
git rm origin-name.txt
git add b.txt
git commit
#执行前面两个git rm时,会告警“file-name : needs merge”,可以不必理会。
1.3.4.1.2. 没有差异的文件执行合并--fast forward
如果当前的分支和另一个分支没有内容上的差异,就是说当前分支的每一个提交(commit)都已经存在另一个分支里了,git 就会执行一个“快速向前"(fast forward)操作;git 不创建任何新的提交(commit),只是将当前分支指向合并进来的分支。
1.3.4.2. git rebase 变基
git checkout mywork
git rebase origin


git rebase
git rebase [-i | --interactive] [<options>] [--exec <cmd>] [--onto <newbase>]
    [<upstream> [<branch>]]
git rebase [-i | --interactive] [<options>] [--exec <cmd>] [--onto <newbase>]
    --root [<branch>]
git rebase --continue | --skip | --abort | --quit | --edit-todo | --show-current-patch
1.3.5. 文件覆盖
git checkout (-p|--patch) [<tree-ish>] [--] [<paths>…] git checkout branch_2 git checkout branch_1 file_1 将工作区的 <paths> 覆盖成索引指向的内容。 当可选项[<tree ish>]给出的时候,符合 <paths>的路径将在索引上和工作区更新 由于上次合并失败,索引可能包含未合并的条目。默认情况下,如果尝试从索引中签出这样的条目,签出操作将失败,并且不会签出任何内容。使用-f将忽略这些未合并的条目。合并的特定方面的内容可以通过使用--ours或--their从索引中签出。使用-m,可以放弃对工作树文件所做的更改,以重新创建原始的冲突合并结果。
1.3.6. 删除分支
# 删除分支
git branch -d [branch-name]
git branch -D [branch-name] # 强制删除

# 删除远程分支
git push origin --delete [branch-name]
git branch -dr [remote/branch]

#不同分支中的 部分文件的合并
# 1. 切换到需要合并的分支
git checkout [branch-name-2]
# 2. checkout修改的文件
git checkout [branch-name-1]  <dir_paths>

# <paths>: config/,xxx.php
1.4. 信息查看
# 显示有变更的文件
git status

# 显示当前分支的版本历史
git log

# 显示commit历史,以及每次commit发生变更的文件
git log --stat

# 搜索提交历史,根据关键词
git log -S [keyword]

# 显示某个commit之后的所有变动,每个commit占据一行
git log [tag] HEAD --pretty=format:%s

# 显示某个commit之后的所有变动,其"提交说明"必须符合搜索条件
git log [tag] HEAD --grep feature

# 显示某个文件的版本历史,包括文件改名
git log --follow [file]
git whatchanged [file]

# 显示指定文件相关的每一次diff
git log -p [file]

# 显示过去5次提交
git log -5 --pretty --oneline


###  优雅的查看log
#参考:https://stackoverflow.com/questions/1057564/pretty-git-branch-graphs

git log --all --decorate --oneline --graph

#可以在git config里面设置 别名 alias
git config --global alias.adog "log --all --decorate --oneline --graph"
git adog

# 显示所有提交过的用户,按提交次数排序
git shortlog -sn

# 显示指定文件是什么人在什么时间修改过
git blame [file]

# 显示暂存区和工作区的差异
git diff

# 显示暂存区和上一个commit的差异
git diff --cached [file]

# 显示工作区与当前分支最新commit之间的差异
git diff HEAD

# 显示两次提交之间的差异
git diff [first-branch]...[second-branch]

# 显示今天你写了多少行代码
git diff --shortstat "@{0 day ago}"

# 显示某次提交的元数据和内容变化
git show [commit]

# 显示某次提交发生变化的文件
git show --name-only [commit]

# 显示某次提交时,某个文件的内容
git show [commit]:[filename]

# 显示操作记录
git reflog

#执行了gitk后会有一个很漂亮的图形的显示项目的历史。
gitk
1.5. 远程仓库管理
1.5.1. 设置远程分支
# 增加一个新的远程仓库,并命名
git remote add [remote shortname] [url]

# [url] 格式
# https://github.com/[user_name]/[Project_name].git

git remote add origin https://github.com/zhang787jun/tmp.git
1.5.2. 查看远程仓库
# 显示所有远程仓库
git remote -v

# 显示某个远程仓库的信息
git remote show [remote shortname]
1.5.3. 删除远程分支
git remote rm [remote shortname]
1.5.4. 同步远程分支
# 下载远程仓库的所有变动
git fetch [remote shortname]

# 下载远程仓库[branch_name] 分支到本地[local branch_name]分支
git fetch [remote shortname] [remote branch_name]:[local branch_name]
git fetch origin master:master

# 取回远程仓库的变化,并与本地分支合并
# pull=fetch+merge
git pull [remote shortname] [branch-name]

# 上传本地指定分支到远程仓库
git push [remote shortname] [branch-name]

# 强行推送当前分支到远程仓库,即使有冲突
git push [remote shortname] --force

# 推送所有分支到远程仓库
git push [remote shortname] --all
1.6. 打标签
# 创建标签
git tag -a v1.4 -m "my version 1.4"
# 列出所有标签
git tag
标签 推送
默认情况下,git push并不会把tag标签传送到远端服务器上,只有通过显式命令才能分享标签到远端仓库。
1.push单个tag,命令格式为:git push origin [tagname]
例如:
git push origin v1.0 #将本地v1.0的tag推送到远端服务器
2.push所有tag,命令格式为:git push [origin] --tags
例如:
git push --tags
或
git push origin --tags
1.7. 版本退回
#HEAD指向的版本就是当前版本,因此,Git允许我们在版本的历史之间穿梭,使用命令
git reset --hard commit_id
#穿梭前,用git log可以查看提交历史,以便确定要回退到哪个版本。
git log

# 要重返未来,用git reflog查看命令历史,以便确定要回到未来的哪个版本。
git reflog

# 恢复暂存区的指定文件到工作区
git checkout [file]

# 恢复某个commit的指定文件到暂存区和工作区
git checkout [commit] [file]

# 恢复暂存区的所有文件到工作区
git checkout .

# 重置暂存区的指定文件,与上一次commit保持一致,但工作区不变
git reset [file]

# 重置暂存区与工作区,与上一次commit保持一致
git reset --hard

# 重置当前分支的指针为指定commit,同时重置暂存区,但工作区不变
git reset [commit]

# 重置当前分支的HEAD为指定commit,同时重置暂存区和工作区,与指定commit一致
git reset --hard [commit]

# 重置当前HEAD为指定commit,但保持暂存区和工作区不变
git reset --keep [commit]

# 新建一个commit,用来撤销指定commit
# 后者的所有变化都将被前者抵消,并且应用到当前分支
git revert [commit]

# 暂时将未提交的变化移除,稍后再移入
git stash
git stash pop
1.8. 第三方模块管理
git submodule,git subtree这两个命令通常用来管理公用的第三方模块。比如一些通用的底层逻辑、中间件、还有一些可能会频繁变化的通用业务组件。 当然,两者还是有区别的。
1.8.1. git submodule
git submodule 主要用来管理一些单向更新的公共模块或底层逻辑。
1.8.2. git subtree
git subtree 对于部分需要双向更新的可复用逻辑来说,特别适合管理。比如一些需要复用的业务组件代码。在我之前的实践中,我也曾用subtree来管理构建系统逻辑。
1.9. 储藏
当你正在做一项复杂的工作时, 发现了一个和当前工作不相关但是又很讨厌的bug. 你这时想先修复bug再做手头的工作, 那么就可以用 git stash 来保存当前的工作状态, 等你修复完bug后,执行'反储藏'(unstash)操作就可以回到之前的工作里.
git stash "work in progress for foo feature"
上面这条命令会保存你的本地修改到储藏(stash)中, 然后将你的工作目录和索引里的内容全部重置, 回到你当前所在分支的上次提交时的状态.
好了, 你现在就可以开始你的修复工作了.
·······
git commit -a -m "blorpl: typofix"
当你修复完bug后, 你可以用git stash apply来回复到以前的工作状态.
git stash apply <stash-name>
储藏队列
你也可多次使用'git stash'命令, 每执行一次就会把针对当前修改的‘储藏’(stash)添加到储藏队列中. 用'git stash list'命令可以查看你保存的'储藏'(stashes):
git stash list
>>>
stash@{0}: WIP on book: 51bea1d... fixed images
stash@{1}: WIP on master: 9705ae6... changed the browse code to the official repo
# 可以用类似'git stash apply stash@{1}'的命令来使用在队列中的任意一个'储藏'(stashes)
git stash apply stash@{1}
#则是用来清空这个队列
git stash clear
1.10. 设置代理
git config --global https.proxy http://127.0.0.1:1080
git config --global http.proxy http://127.0.0.1:1080
# 禁用代理
git config --global  --unset http.proxy
git config --global  --unset https.proxy
1.11. Git 维护
1.11.1. 压缩仓库中的历史信息
在大的仓库中, git靠压缩历史信息来节约磁盘和内存空间。压缩操作并不是自动进行的, 你需要手动执行 git gc,压缩操作比较耗时, 你运行git gc命令最好是在你没有其它工作的时候.
git gc
1.11.2. 压缩提交记录
我们在开发中的时候尽量保持一个较高频率的代码提交,这样可以避免不小心代码丢失。但是真正合并代码的时候,我们并不希望有太多冗余的提交记录,而且 rebase 合并代码的时候,会把每个 commit 都处理一下,有时候会造成冗余的工作。 所以,压缩日志之后不经能让 commit 记录非常整洁,同时也便于使用 rebase 合并代码。
那么,如何压缩commit记录呢?
1.11.2.1. git reset
- 使用
git log找到起始 commitID git reset <init_commitID>,切记不要用 --hard 参数- 重新
git add . --all+git commit -m "newlog2",此时本地仓库的该分支就两条log:[initlog,newlog2] git push -f origin branchName,因为会有冲突,所以需要强制覆盖远端分支,请务必谨慎。 合并到 master 中,然后更新远端 master。
1.11.2.2. git commit --amend
[不推荐]
git commit --amend:追加 commit 到上一个 commit 上。
1.11.2.3. git rebase
[不推荐]
git rebase -i:通过交互式的 rebase,提供对分支 commit 的控制,从而可以清理混乱的历史。
1.11.3. 清空分支的commit log记录
# 创建新的分支
git checkout --orphan  new_branch

#添加所有文件变化至暂存空间
git add -A

#提交并添加提交记录
git commit -am "commit message"
#删除master分支
git branch -D <master-name>

#重新命名当前独立分支为 master
git branch -m <master>

#推送到远端分支
git push -f origin <master>
1.11.4. 保持可靠性
git fsck 运行一些仓库的一致性检查, 如果有任何问题就会报告. 这项操作也有点耗时, 通常报的警告就是“悬空对象"(dangling objects).
git fsck
dangling commit 7281251ddd2a61e38657c827739c57015671a6b3
dangling commit 2706a059f258c6b245f298dc4ff2ccd30ec21a63
dangling commit 13472b7c4b80851a1bc551779171dcb03655e9b5
dangling blob 218761f9d90712d37a9c5e36f406f92202db07eb
dangling commit bf093535a34a4d35731aa2bd90fe6b176302f14f
dangling commit 8e4bec7f2ddaa268bef999853c25755452100f8e
dangling tree d50bb86186bf27b681d25af89d3b5b68382e4085
dangling tree b24c2473f1fd3d91352a624795be026d64c8841f
“悬空对象"(dangling objects)并不是问题, 最坏的情况只是它们多占了一些磁盘空间. 有时候它们是找回丢失的工作的最后一丝希望.
